Want your cold emails to land in inboxes, not spam? Setting up DKIM (DomainKeys Identified Mail) is essential for email authentication. Without it, nearly half of emails never reach their destination. Here’s why DKIM matters and how to set it up:
Stat to Remember: Emails without DKIM are 3x more likely to end up in spam. Gmail and Outlook now require DKIM for bulk senders.
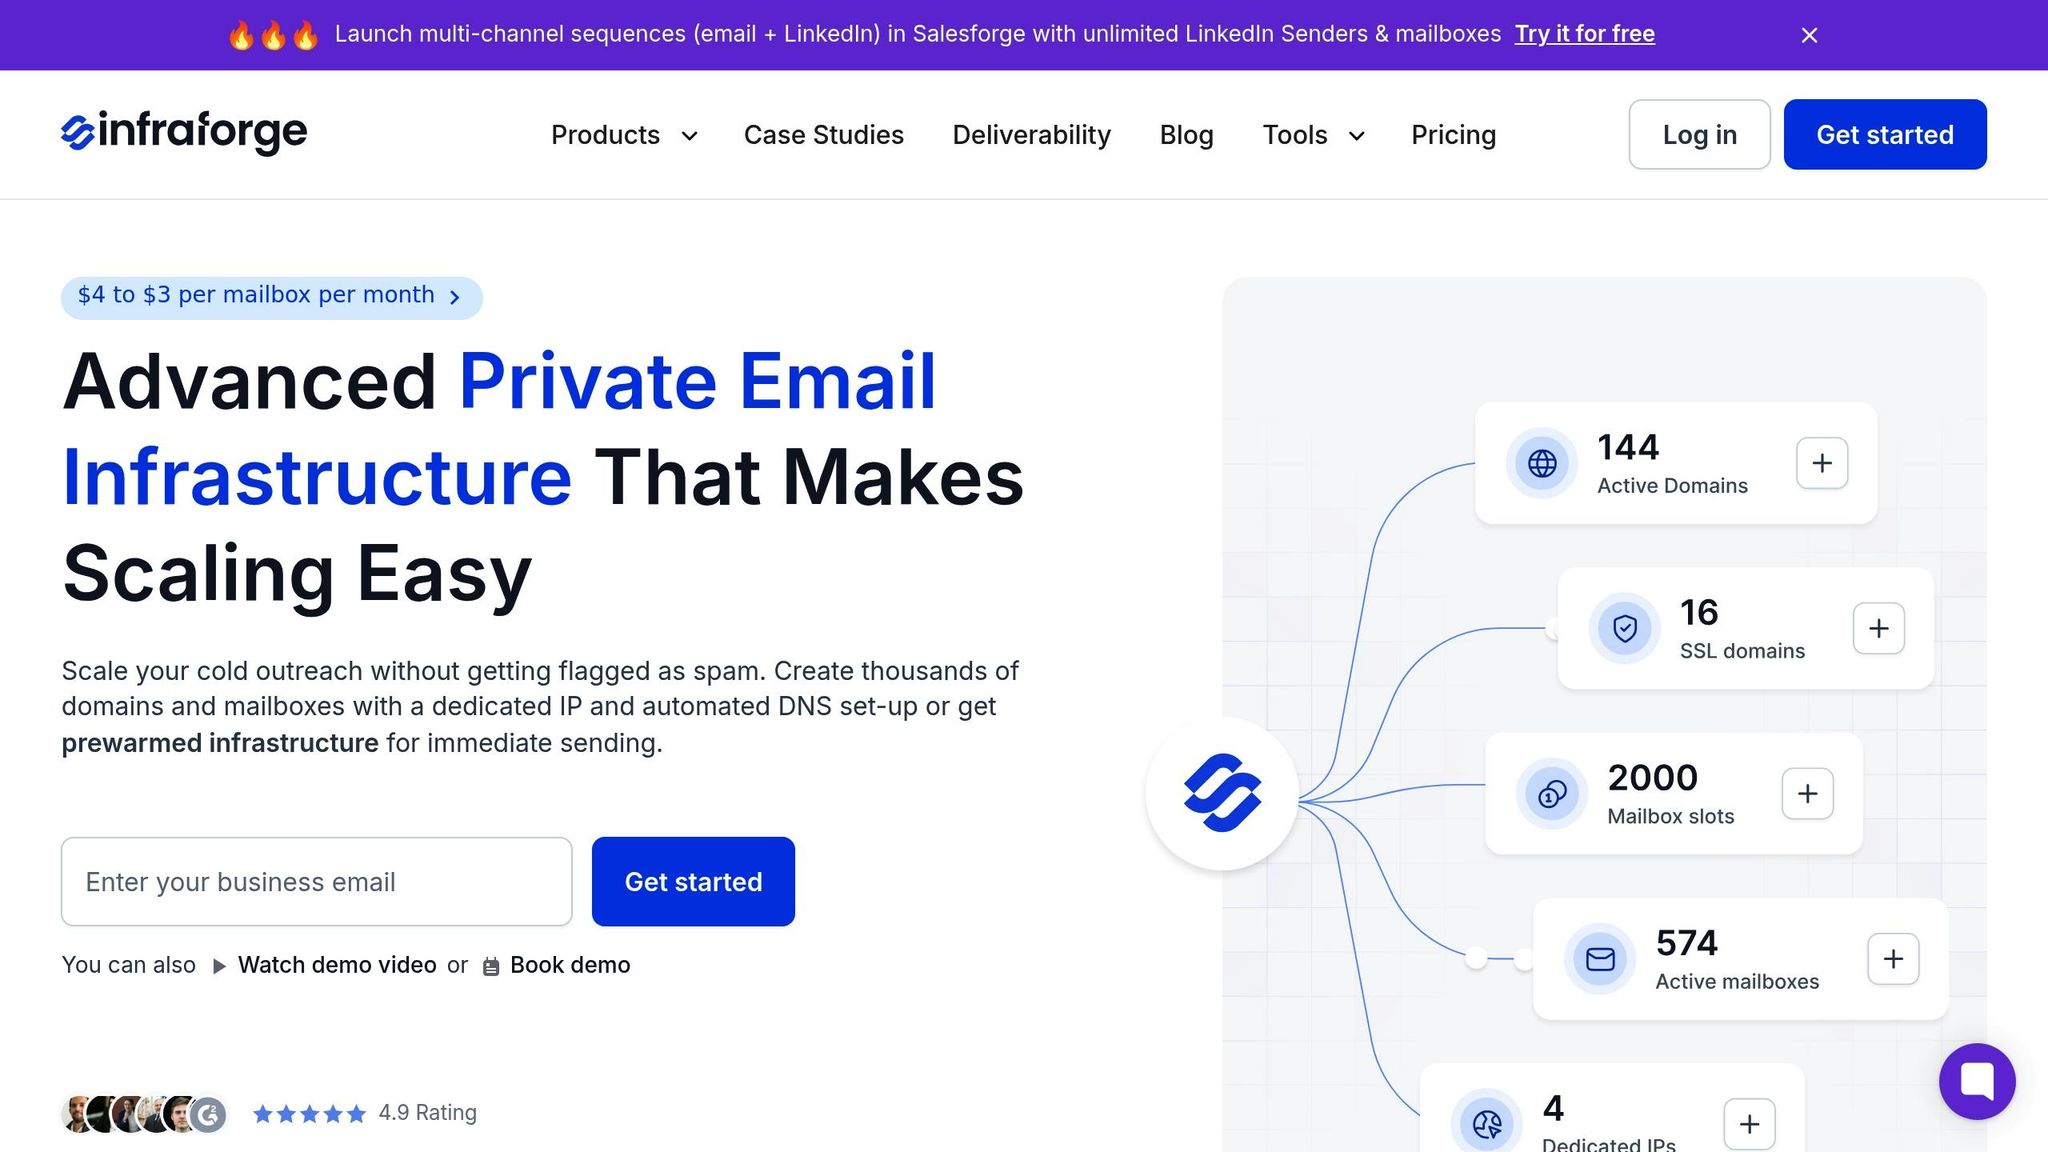
For large-scale campaigns, tools like Infraforge automate DKIM setup, saving time and reducing errors. Whether you’re sending 100 or 100,000 emails, DKIM is the first step to better deliverability.
DKIM, or DomainKeys Identified Mail, is an email authentication method that uses cryptographic signatures to confirm two things: that an email was sent by the domain owner and that it hasn't been altered during transmission. Think of it like a digital wax seal, ensuring the integrity of your message.
Here’s how it works: DKIM uses a pair of keys - one private and one public. The private key signs specific parts of the email, while the public key, published in your DNS TXT record, allows the recipient to verify the signature. When you send an email, your server creates a hash of the email’s content, encrypts it with the private key, and adds it to the DKIM-Signature header. The recipient’s server then reads this header, identifies your domain (via the d= tag) and selector (via the s= tag), retrieves the public key through a DNS lookup, and verifies the signature. If everything matches, the email passes DKIM authentication. This process not only validates your email but also strengthens your sender reputation, which can lead to better deliverability.
To enhance security, it’s a good idea to use 2048-bit keys instead of 1024-bit ones. Major providers like Google support 2048-bit keys, offering a more secure option.
One critical detail: the domain in your DKIM signature (d=) must align with the domain in your "From" address to pass DMARC alignment checks. Organizations that enforce DMARC, which combines DKIM and SPF, report a dramatic reduction in phishing attacks - by as much as 80–90%.
DKIM plays a big role in whether your emails land in the inbox or get flagged as spam. Providers like Gmail and Outlook use DKIM as a trust signal to confirm you’re a legitimate sender.
"Email deliverability is 80% setup, 20% copy." - Frank Bacon, Author
By improving inbox placement, DKIM helps shield your domain’s reputation from spoofing. If attackers can’t impersonate your domain, your sender reputation remains intact - a crucial factor for successful cold email campaigns, especially when reaching out to new audiences.
DKIM works alongside SPF and DMARC to create a layered defense for your email reputation. Each protocol has its own role in protecting your emails:
| Protocol | Primary Function | What It Protects | How It Works |
|---|---|---|---|
| SPF | Verifies the sending server | IP-based spoofing | Checks if the sender’s IP is on the authorized list |
| DKIM | Verifies email integrity | Content tampering and spoofing | Uses cryptographic signatures to confirm authenticity |
| DMARC | Enforces domain-level policies | Overall domain abuse | Requires SPF or DKIM alignment and sets failure policies |
One key difference is how these protocols handle forwarded emails. SPF can fail if the forwarding server’s IP isn’t on your authorized list, but DKIM signatures remain intact because they’re embedded in the email. This makes DKIM especially useful for cold email campaigns where forwarding might occur.
"DKIM, DMARC, and SPF are important for protecting your domain. Implemented correctly, they’ll boost your deliverability rate and customer experience." - Valimail
These protocols aren’t optional - you need all three. For instance, Gmail expects bulk senders to maintain spam complaint rates below 0.3% in Postmaster Tools. Proper authentication is your first line of defense in building a reliable cold email system. For more advanced strategies, explore our cold email infrastructure resources.
(function(d,u,ac){var s=d.createElement('script');s.type='text/javascript';s.src='https://a.omappapi.com/app/js/api.min.js';s.async=true;s.dataset.user=u;s.dataset.campaign=ac;d.getElementsByTagName('head')[0].appendChild(s);})(document,372145,'feze9r0wnb47lvigfxao');

4-Step DKIM Setup Process for Email Authentication
Setting up DKIM (DomainKeys Identified Mail) involves four main steps: generating your key pair, adding the public key to your DNS, enabling DKIM signing on your email platform, and testing the configuration. While the process itself typically takes 15–30 minutes, DNS propagation can take up to 24 hours.
Start by creating a private key (stored on your email server) and a public key (added to your DNS). You’ll need to provide your domain name and a selector, which is a unique identifier that helps email servers find your public key in DNS records.
To generate a 2048-bit key pair, use your email platform’s tools. For example:
If you’re using a custom server, tools like DKIM Core or EasyDMARC can simplify the process. For better security, always opt for 2048-bit keys instead of 1024-bit, as major platforms support this stronger encryption.
Once you’ve generated your keys, you’re ready to publish the public key.
Add the public key to your domain’s DNS as a TXT record. The exact process depends on your email provider:
For DNS providers like Cloudflare, GoDaddy, or Namecheap, look for the "Add Record" option, select TXT, and enter your selector (e.g., "selector1._domainkey") along with the public key string.
Make sure to copy the key exactly as provided - no extra spaces, quotes, or line breaks. Even a small mismatch can cause verification to fail. DNS changes may take a few minutes or up to 24 hours to propagate, so don’t panic if your setup doesn’t work immediately.
Once the DNS record is published, enable DKIM signing to ensure outgoing emails include the required signature. This step is usually straightforward:
Without enabling DKIM signing, even a correct DNS setup won’t add the signature to your emails. Double-check this step before moving forward.
Before launching your email campaign, test your DKIM setup. Several free tools can help:
For a more hands-on approach, send a test email to yourself and check the raw headers. In Gmail, open the email, click the three dots, select "Show original", and look for "DKIM=pass" under authentication results. If you see "DKIM=fail" or "DKIM=none", something is wrong.
| Test Result/Error | Meaning | How to Fix |
|---|---|---|
| DKIM=pass | Signature verified | No action needed |
| DKIM=fail | Signature doesn’t match | Verify keys and selector accuracy |
| DKIM=none | No signature found | Enable DKIM signing and confirm DNS record |
| Record Not Found | DNS lookup failed | Wait for propagation or check selector |
| Invalid Format | DNS syntax error | Remove extra quotes or line breaks |
"Delivered ≠ Seen. You can have a 99% delivery rate and still end up in Spam... Without DKIM, you're invisible to the inbox." - Frank Bacon, Mailforge
If your test results show "DKIM=pass", you’re good to go. Otherwise, use the troubleshooting table above to resolve any issues. Remember, nearly half of emails fail to reach the inbox without proper authentication, so it’s worth the effort to get this right.
Running high-volume email campaigns, especially those exceeding 100,000 emails per month, demands careful DKIM management across multiple domains and IPs. A single misstep, like a misconfigured key, can severely impact deliverability, and manually managing such operations is both time-consuming and error-prone. These strategies build on the initial DKIM setup to ensure ongoing security and efficiency for high-scale operations.
Rotating DKIM keys is a critical practice to maintain security. Aim to rotate keys at least twice a year, or even quarterly for enhanced protection, particularly for high-volume campaigns. While quarterly rotation adds complexity, it provides an extra layer of security for sensitive operations.
Avoid rotating DKIM keys during IP changes. Instead, overlap the old and new keys for 7–10 days to allow recipient servers to associate the new key with your domain’s reputation. During this transition, perform a DKIM audit using tools like MXToolbox or by sending test emails to verify a "DKIM=pass" header. For organizations still using 1024-bit keys, quarterly rotation is highly recommended. Regular rotation not only safeguards your sender reputation but also supports consistent deliverability.
Managing DKIM for multiple domains introduces additional challenges. To ensure smooth deliverability, align the DKIM signature domain with the "From" header domain, as mismatched configurations are responsible for approximately 85% of DKIM-related issues. This alignment is essential for passing DMARC checks and maintaining trust across all sending channels.
The choice between shared and dedicated IPs also plays a role in DKIM management. Shared IPs are ideal for campaigns under 100,000 emails per month, as they’re often included in basic plans and don’t require a warm-up period. However, for larger campaigns, dedicated IPs are better suited as they provide full control over sender reputation. Keep in mind that dedicated IPs typically cost $1–$5 per month per IP and require a gradual warm-up period of 2–6 weeks. Additionally, ensure reverse DNS (rDNS) is correctly configured, as missing PTR records are a leading cause of delivery failures.
"Procedures that usually took hours (setting DKIM, SPF, etc. records) for multiple domains, now take a few minutes." - Karlo Binda, Founder, Leadsnack.co
At scale, automation becomes indispensable. Tools that enable bulk DNS updates and automated key rotation drastically reduce the risk of errors and save significant time. A recent analysis of 500,000 DKIM records revealed that 16,000 contained critical errors. Misconfigured DNS settings can lead to major deliverability problems, making automation a vital component for maintaining reliable email performance.
Setting up DKIM manually across multiple domains can be a real headache. It involves generating keys, updating DNS records, configuring platforms, and then testing everything - all while trying to avoid mistakes. For teams managing large-scale cold email campaigns, this process can quickly become overwhelming and inefficient.
Infraforge streamlines this entire process by automating the configuration of DMARC, SPF, and DKIM according to industry standards. What might take hours - or even days - manually can now be done in just minutes. This means you can spend more time focusing on your outreach strategy instead of wrestling with DNS configurations. Plus, automation reduces the likelihood of errors, which is a big deal when comparing it to the manual approach.
The contrast between manual and automated setup is stark, especially when managing infrastructure at scale. Manual setup demands technical know-how, constant monitoring, and a significant time commitment. A single mistake in a DNS record can throw off an entire campaign's deliverability, creating unnecessary headaches. Infraforge eliminates these risks while improving deliverability and maintaining your email reputation.
| Feature | Manual Setup | Infraforge |
|---|---|---|
| Time | Hours/Days | 5 Minutes |
| DNS Configuration | Manual | Automated |
| Key Rotation | Manual | Automated |
| Dedicated IPs | Extra setup | Included |
| Cost (200 Mailboxes) | $1,200–$1,680/month | $651/month |
Infraforge offers automated DNS setup and includes dedicated IPs for $651 per month, with mailbox costs ranging from $3 to $4 each.
"For each domain you add to Infraforge, we take care of setting up DMARC, SPF, DKIM and custom domain tracking, following industry best practices." - Infraforge
On top of saving time and money, Infraforge provides the tools and support needed for high-volume campaigns.
Managing high-volume campaigns requires constant oversight and reliable infrastructure. Infraforge simplifies this with multi-IP provisioning, priced at $99 per IP per month. This feature spreads the email-sending load across dedicated IP addresses, which is crucial for campaigns sending hundreds of thousands of emails each month.
The platform's integration with Salesforge creates a smooth workflow between email infrastructure and campaign execution. Authentication data syncs automatically into multi-channel sequences, eliminating the need for manual setup between systems. Additionally, the Masterbox feature centralizes responses from all mailboxes into a single view, making it easier to manage multiple sending addresses. This feature is available for $7 per workspace per month when billed annually.
UniteSync, for example, saw reply rates increase by 17% and acquisition costs drop to $2.86 after integrating Infraforge into their workflow.
"The ease of use and simplicity make managing email infrastructure a breeze, and the pricing is spot on - far more reasonable than some of the other options." - Anton L, Founder
DKIM plays a crucial role in ensuring your emails stay intact during transit, which directly impacts whether they land in the inbox or get flagged as spam. Without DKIM in place, even the most well-designed outreach campaigns can fail to reach their intended audience.
Although setting up DKIM is relatively simple, managing it manually - especially at scale - can lead to errors and inefficiencies.
That’s where Infraforge steps in to simplify the process. By automating DKIM configuration, along with SPF and DMARC setup, Infraforge reduces what could take hours to just 5 minutes per domain. The platform also automates key rotation, assigns dedicated IPs for each mailbox, and enables bulk DNS updates across multiple domains - all with ease.
For businesses running high-volume email campaigns, Infraforge’s automation not only saves time but also boosts deliverability and reduces costs.
DKIM, or DomainKeys Identified Mail, plays a crucial role in cold email campaigns. It acts as a digital signature, verifying that your emails are genuinely sent from your domain and haven’t been altered during transit. This added layer of security not only boosts your email deliverability but also helps keep your messages out of spam folders, safeguarding your domain’s reputation.
When you implement DKIM, you’re essentially signaling to email service providers and recipients that you’re a trustworthy sender. This trust is vital for ensuring your cold outreach efforts hit the right inboxes and maintain your credibility. It’s a straightforward yet impactful step for anyone serious about effective email campaigns.
DKIM improves email deliverability by attaching a digital signature to outgoing emails. This signature enables receiving servers to confirm that the email originates from a legitimate domain and hasn’t been altered during its journey.
By verifying both the sender's identity and the email's integrity, DKIM helps establish trust with email providers. This, in turn, boosts your sender reputation and lowers the risk of your emails being marked as spam or rejected. For cold email outreach campaigns, this can make all the difference in getting your messages through.
Setting up DKIM for large-scale cold email campaigns doesn’t have to be a headache, especially with tools that handle key generation, DNS updates, and ongoing management automatically. Infraforge takes care of the heavy lifting by generating DKIM keys, publishing DNS records directly to your provider, and keeping an eye on the setup in real time. This automation removes the manual steps that can slow down your ability to scale.
For teams relying on shared email infrastructure, Mailforge offers similar features, including bulk DNS updates across multiple domains. If you’re already using the Forge Stack, the Salesforge DKIM Generator is a free tool that simplifies key generation and automates DNS insertion when paired with Infraforge or Mailforge. These tools not only cut down on errors but also save valuable time. Among them, Infraforge stands out with its dedicated IP model, private email infrastructure, and API integration, making it ideal for seamless scaling.