Testing your email server settings is crucial to ensure reliable email delivery, prevent security vulnerabilities, and avoid emails landing in spam folders. Here's a quick overview of what you need to know and do:
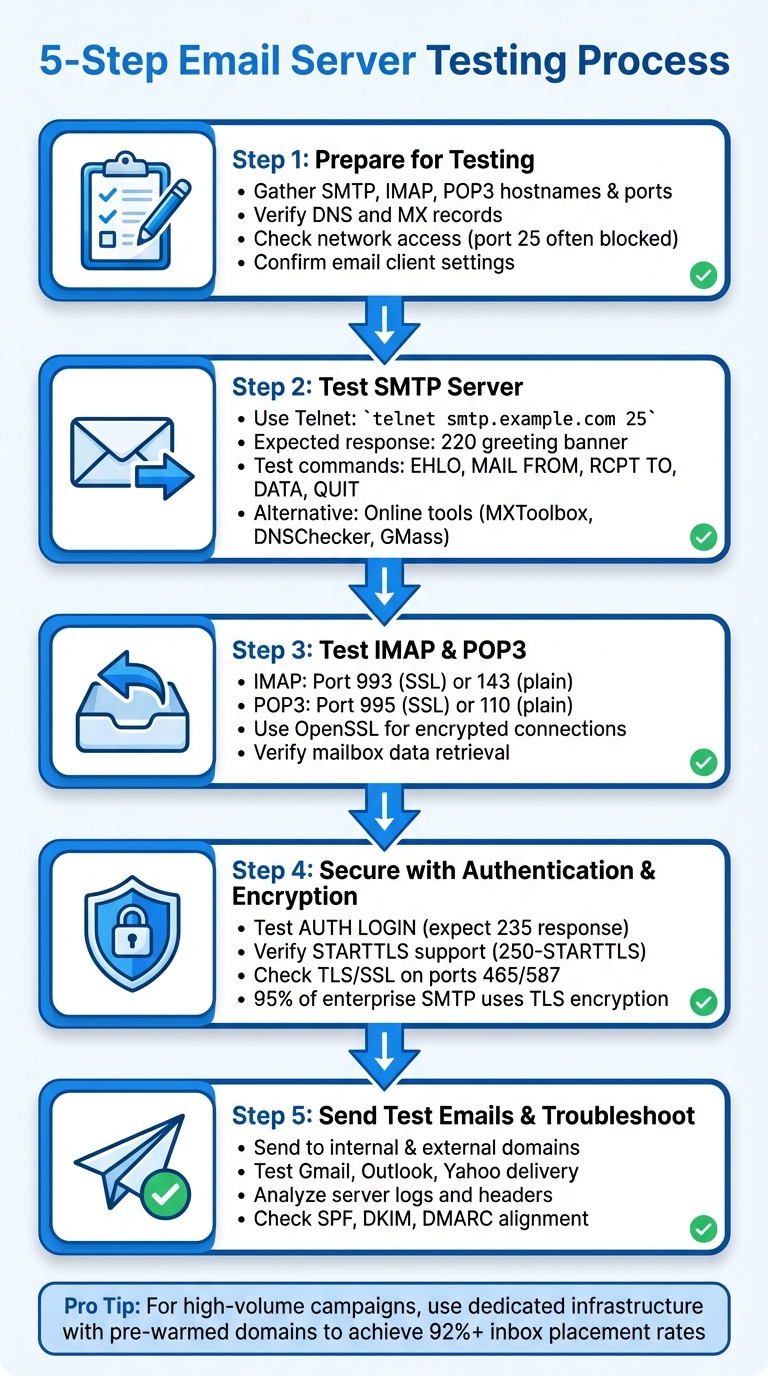
5-Step Email Server Testing Process: SMTP, IMAP, and POP3 Configuration Guide
Before diving into testing, make sure you’ve gathered all the necessary details and verified your DNS setup. Skipping these steps can lead to wasted time and troubleshooting headaches.
Start by collecting your SMTP, IMAP, and POP3 hostnames, ports, encryption types (like TLS, SSL/STARTTLS, or none), and your login credentials (username and password). You can usually find this information in your email provider’s documentation. If you’re using a platform like Auth0 or a transactional email service, check their dashboard for specific SMTP configuration details.
Next, ensure your network access is in order. Many ISPs in the U.S. block outbound SMTP port 25 on residential connections to combat spam, which can cause "connection failed" errors even if everything else is correctly set up. To test connectivity, run telnet mail.example.com 25 from Command Prompt or Terminal. If the connection doesn’t go through, check your firewall settings or contact your ISP for assistance.
Your MX records are critical - they direct email traffic to the correct mail servers for your domain. If they’re misconfigured or missing, emails won’t reach their destination. According to Microsoft, many organizations use multiple MX records with different preference values (e.g., 10 and 20) to balance load and provide failover options. The lower the number, the higher the priority.
To check your MX records on Windows, open Command Prompt and type nslookup. Then enter set type=mx followed by your domain name (e.g., mailenable.com). The output should look something like: mailenable.com MX preference = 10, mail exchanger = mail.mailenable.com, confirming the correct mail server hostname. For a faster option, try MXToolbox Email Server Test. Just input your domain, and it will generate a detailed report on your MX records, reverse DNS (PTR), and any potential issues like blacklisting or open relays.
Common problems include missing MX records, conflicting entries with incorrect priorities, or propagation delays (which can take up to 48 hours). If nslookup doesn’t return MX records or MXToolbox flags "No MX Record", emails won’t deliver. Additionally, check your A record (which maps your mail hostname to an IP), PTR record (reverse DNS for your sending IP), and authentication records like SPF, DKIM, and DMARC. While these aren’t required for basic connectivity, they are essential for ensuring successful email delivery in production environments.
After verifying your DNS and MX records, make sure your email client settings match these configurations.
Double-check that your email client settings are accurate. In popular clients like Outlook, Apple Mail, or Thunderbird, confirm the server names and ports, the correct username format (some require the full email address, others just the local part), and the security settings - for example, SMTP port 587 with STARTTLS or IMAP 993 with SSL/TLS. Also, ensure that authentication is enabled for outgoing SMTP, often labeled as "My outgoing server requires authentication."
When testing SSL ports, Telnet won’t provide a plain response, but it will connect. To simulate an SMTP transaction and validate server functionality, use online tools like the DNSChecker SMTP Test Tool. These tools allow you to input the hostname or IP, sender and recipient addresses, and confirm whether the server accepts connections.
If you’re running a high-volume cold email setup with dedicated infrastructure, such as Infraforge, it’s especially important to validate DNS and MX records, PTR entries, and SSL certificates before scaling up. Infraforge simplifies DNS configuration for new domains by automating the setup of DMARC, SPF, and DKIM records. It also offers bulk DNS updates and real-time deliverability monitoring, saving time and preventing configuration errors that could skew your testing outcomes.
(function(d,u,ac){var s=d.createElement('script');s.type='text/javascript';s.src='https://a.omappapi.com/app/js/api.min.js';s.async=true;s.dataset.user=u;s.dataset.campaign=ac;d.getElementsByTagName('head')[0].appendChild(s);})(document,372145,'feze9r0wnb47lvigfxao');
After confirming your DNS and client settings, the next step is to ensure your SMTP server can send emails and properly authenticate users. This involves simulating the email-sending process to spot any misconfigurations before they disrupt delivery. One effective way to do this is by using Telnet to mimic an SMTP conversation and verify the server's responses.
Telnet is a straightforward tool for testing SMTP functionality. It allows you to manually issue commands and observe the server's responses. If you're on Windows, you might need to enable the Telnet client first. To do this, go to "Turn Windows features on or off" in the Control Panel and check the box for Telnet Client. Once it's enabled, open Command Prompt and type:
telnet smtp.example.com 25
Replace smtp.example.com with your SMTP server's hostname and 25 with the port you're using. If the connection is successful, you'll see a 220 greeting banner like this:
220 smtp.example.com ESMTP ready
This confirms the server is ready to accept connections. From here, you can start an SMTP conversation by typing:
EHLO yourdomain.com
For older servers, use HELO instead. A 250 response should follow, listing features like STARTTLS and AUTH. To find your server's MX record beforehand, you can use:
nslookup -type=mx domain.com
Next, enter the following commands in sequence:
MAIL FROM:<[email protected]>RCPT TO:<[email protected]>DATAAfter typing your subject and message body, end the message by entering a single period (.) on its own line. If you receive 250 or 354 responses for each command, your server is functioning as expected. To wrap up, type:
QUIT
This ends the session with a 221 sign-off.
For example, Microsoft's Exchange documentation from 2023 outlines a successful session: connecting to mail1.fabrikam.com from contoso.com resulted in a 220 response upon connection, followed by 250 responses for EHLO, MAIL FROM, and RCPT TO commands, and the correct 354 and 221 responses during and after the DATA command.
Here’s a quick reference for typical Telnet commands and their expected responses:
| SMTP Telnet Command | Expected Response | Purpose |
|---|---|---|
| telnet server 25 | 220 | Initial connection |
| EHLO/HELO domain | 250 | Server greeting |
| MAIL FROM:<sender> | 250 | Sender validation |
| RCPT TO:<recipient> | 250 | Recipient validation |
| DATA | 354 | Start message body |
| . (period alone) | 250 | End message |
| QUIT | 221 | Close session |
If Telnet fails or times out, check that the SMTP service is active and that your firewall allows traffic on the specified port. Be aware that many U.S. ISPs block outbound port 25 to prevent spam. If the connection opens but no readable banner appears, your server might require SSL encryption - Telnet cannot handle encrypted traffic. In such cases, use this command to test a secure connection:
openssl s_client -connect server:587 -starttls smtp
For testing authentication, issue the EHLO command and then use AUTH LOGIN. You'll need Base64-encoded credentials, which can be generated with a command like echo -n "[email protected]" | base64 on macOS or Linux. A 235 response indicates successful authentication, while a 535 response signals an issue. Keep in mind that Telnet transmits credentials in plain text, so only use it in secure or temporary test environments.
To document your Telnet session for troubleshooting, use your terminal’s logging features or redirect the output to a file. This can be helpful when working with your hosting provider to resolve issues.
If command-line testing feels too technical, several online tools can streamline the process. These tools simulate email-sending scenarios and identify common issues without requiring manual input. Some popular options include:
Here’s a summary of some online tools and their features:
| Online SMTP Tool | Key Features |
|---|---|
| MXToolbox Diagnostic | Open relay test, reverse DNS check |
| DNSChecker SMTP Test | Simulated email transfer with host, sender, and recipient details |
| GMass SMTP Test | Detailed SMTP conversation log for common email services |
These tools often verify STARTTLS negotiation, supported encryption protocols, and authentication capabilities without exposing sensitive credentials.
For businesses running large-scale email campaigns, platforms like Infraforge offer advanced solutions. Features include pre-warmed mailboxes, dedicated IPs, automated DNS and SSL setup, and API-based scaling. This allows you to focus on maintaining sender reputation and deliverability instead of troubleshooting basic connectivity issues.
After confirming that your SMTP setup works, the next step is to test incoming mail protocols. IMAP is ideal for server-synced email, while POP3 is better suited for local email downloads.
IMAP typically uses port 143 for unencrypted connections and port 993 for SSL/TLS-secured connections. Since most modern servers require encryption, you'll likely be testing on port 993. Start by opening your terminal and running this command:
openssl s_client -connect yourserver.com:993 -quiet
If the connection is successful, you'll see a certificate handshake followed by a "ready" prompt. Next, log in by typing:
a1 LOGIN username password
Replace username and password with your actual credentials. A successful response will look like this:
a1 OK LOGIN completed
To confirm that mailbox data is accessible, use the following command:
a2 LIST "" "*"
This will display all available folders. For example:
* LIST (\HasNoChildren) "/" "INBOX"
a2 OK LIST completed
These responses confirm that the server can authenticate users and retrieve mailbox data.
For testing non-SSL connections on port 143, you can use:
telnet yourserver.com 143
Important: Testing with plain text credentials is risky and should only be done in secure environments. If you encounter issues like timeouts, check your firewall settings and ensure your ISP isn’t blocking the port. A response like -ERR Login failed usually points to incorrect credentials or authentication settings.
Alternatively, email clients such as Thunderbird or Outlook can verify IMAP settings automatically. Simply input your server details (e.g., hostname, port 993 with SSL/TLS enabled) and sync the account. If the client successfully retrieves folder structures and messages, your IMAP configuration is correct.
Once IMAP is verified, move on to testing POP3 to ensure full inbound email retrieval.
POP3 typically operates on port 995 for SSL/TLS and port 110 for plain text connections. Since encryption is standard, start by testing port 995. Use this command in your terminal:
openssl s_client -connect yourserver.com:995 -quiet
After the handshake completes, log in by typing:
USER username
A successful response will look like:
+OK
Follow this with:
PASS password
If you see another +OK, the authentication is successful. To check if messages can be retrieved, type:
LIST
The server will respond with a list of messages, showing their numbers and sizes (e.g., 1 2048 for a message that’s 2,048 bytes).
For non-SSL testing on port 110, use:
telnet yourserver.com 110
If you encounter errors like "connection refused", it may indicate a blocked port or firewall issue. Timeouts could point to DNS problems or ISP restrictions. Double-check your network settings to resolve these issues.
Some tools, like ServiceDesk Plus, include a "Fetch a sample mail" feature to test POP3 connectivity by retrieving mailbox content. This can simplify the process once ports and authentication details are confirmed.
For cold email setups, ensuring that IMAP and POP3 configurations are working is essential. Tools like Infraforge can streamline this process by automating domain testing and syncing inbound email retrieval with outreach platforms. Their features, including dedicated IPs, SSL masking, and API support, help secure and verify your setup before scaling campaigns.
After confirming your server can send and receive emails, the next crucial step is securing it. Without proper authentication and encryption, your server becomes a target for abuse and may get flagged or blocked by major providers. According to the 2024 Postmark State of Email Deliverability report, servers lacking STARTTLS are rejected by 80% of major email receivers.
Authentication ensures that only users with valid credentials can send emails, preventing your server from being exploited as an open relay for spammers. Encryption, using TLS/SSL, safeguards data during transmission, keeping sensitive information out of the hands of eavesdroppers. In fact, the 2023 Google Transparency Report revealed that over 95% of enterprise SMTP traffic is now encrypted with TLS, making it a standard practice rather than an optional extra.
Testing your server's authentication setup ensures it blocks unauthorized users. To do this, connect to your SMTP server on port 587 using Telnet:
telnet yourserver.com 587
Once connected, type:
EHLO yourdomain.com
Look for a response like 250-AUTH LOGIN PLAIN, which confirms the server supports authentication. Next, test the login process by typing:
AUTH LOGIN
You'll be prompted for credentials. Enter your Base64-encoded username and password (use echo -n '[email protected]' | base64 to encode them). A successful login will return a 235 response. If you see 535 5.7.8 Username/Password mismatch, either the credentials are wrong, or authentication isn't configured properly.
To confirm the server blocks unauthenticated attempts, try initiating an SMTP transaction without logging in. After connecting and issuing HELO, send:
MAIL FROM:<[email protected]>
RCPT TO:<[email protected]>
A secure server will reject these commands with a 530 or 535 error, confirming it won't relay mail without authentication.
For a streamlined setup, Infraforge can handle authentication by automatically configuring SPF, DKIM, and DMARC records, reducing the risk of manual errors.
Once authentication is verified, move on to testing encryption to secure your emails during transmission.
Encryption testing ensures your server protects email transmissions. STARTTLS is typically used on ports 25 or 587, while implicit TLS runs on port 465. Start by checking if STARTTLS is available. Connect via Telnet to port 25:
telnet yourserver.com 25
Then type:
EHLO yourdomain.com
If you see 250-STARTTLS, your server supports encryption. To test the encrypted connection, use OpenSSL:
openssl s_client -connect yourserver.com:587 -starttls smtp -tls1_2
A successful connection will return Verify return code: 0 along with cipher details. If you encounter errors like "STARTTLS not supported" or certificate mismatches, your TLS configuration may need adjustments.
For implicit TLS on port 465, test with:
openssl s_client -connect yourserver.com:465 -quiet
This command immediately establishes an encrypted connection without requiring a STARTTLS upgrade. If the connection times out, check your firewall settings and ensure SSL is correctly configured on port 465.
| Test Method | Command | Success Indicator | Common Failure |
|---|---|---|---|
| Authentication | telnet server 587 EHLO AUTH LOGIN |
235 2.7.0 Authentication successful | 535 5.7.8 Username/Password mismatch |
| TLS/SSL (STARTTLS) | telnet server 25 EHLO |
250-STARTTLS offered | No STARTTLS support |
| SSL Port 465 | openssl s_client -connect server:465 | Verify return code: 0, cipher (e.g., AES256-GCM) | Connection timeout or handshake failure |
Many ISPs block outbound port 25 to reduce spam, so using port 587 with TLS is often the most reliable option. If you run into issues, check your server logs (e.g., /var/log/maillog on Linux) for authentication errors, verify that your certificates are valid using openssl s_client -showcerts, and ensure your firewall isn’t blocking ports 465 or 587.
Once you've verified authentication and encryption, the next step is to send test emails and identify any potential issues. This process ensures your server can send, route, and deliver emails effectively to various destinations, allowing you to catch and fix configuration problems before going live. Start by sending a test email to a mailbox within your own domain to confirm local delivery. Then, expand your testing to external providers like Gmail, Outlook.com, and Yahoo to see if your emails land in the inbox or the spam folder. Additionally, send a test email to a business domain to check MX routing and corporate spam filters. Request replies from all destinations to confirm two-way communication and ensure proper SPF, DKIM, and DMARC alignment for added reliability. For further testing, you can use command-line tools to simulate real-world email flow conditions.
Command-line tools are incredibly useful for sending test emails without needing to set up an entire email client. They are especially handy for quick diagnostics. If you’re using Linux or macOS, you can rely on cURL to send SMTP emails over port 587 with TLS. Here’s an example command:
curl --url "smtp://smtp.yourdomain.com:587" \
  --ssl-reqd \
  --mail-from "[email protected]" \
  --mail-rcpt "[email protected]" \
  --user "[email protected]:YourStrongPassword" \
  -T <(printf "Subject: SMTP cURL test\r\rThis is a test email sent via cURL.\r")
This command helps confirm that your credentials, port settings, and TLS negotiation are functioning as expected. For Windows users, PowerShell offers a similar option with its Send-MailMessage cmdlet:
Send-MailMessage `
  -From "[email protected]" `
  -To "[email protected]" `
  -Subject "PowerShell SMTP test" `
  -Body "This is a test email from PowerShell." `
  -SmtpServer "smtp.yourdomain.com" `
  -Port 587 `
  -UseSsl `
  -Credential (Get-Credential)
According to Microsoft’s Exchange documentation, manually stepping through SMTP commands can also help diagnose mail flow issues in production environments. If you encounter errors, review your logs and delivery reports to trace the root of the problem.
After sending test emails with command-line tools, dive into your server logs to identify potential issues. Focus on key logs, such as SMTP transaction logs (for sending), IMAP/POP3 logs (for retrieval), and any queue or deferred logs that show emails waiting for delivery. Use filters like message ID, sender, recipient, and timestamp to trace the email’s journey. Pay attention to details like connection attempts, TLS negotiation, authentication results, and server responses.
Repeated deferrals (indicated by 4xx codes) often signal temporary issues, such as rate limiting or reputation concerns. On the other hand, 5xx errors point to hard failures that may require adjustments to your configuration or email content.
You can also analyze the headers of received test emails by selecting "Show original" in your email client. The "Received" headers provide a detailed breakdown of each hop the email took, including IP addresses, hostnames, and timestamps, which can help you identify delays or unexpected relays. Additionally, the "Authentication-Results" header reveals the outcomes of SPF, DKIM, and DMARC checks, highlighting any DNS record or signing issues. Comparing headers from emails that reach the inbox versus those flagged as spam can help pinpoint filtering triggers.
Common deliverability issues include emails landing in spam, soft bounces (4xx codes), hard bounces (5xx codes), or rate limiting when multiple tests are sent. To resolve spam placement, double-check your SPF, DKIM, and DMARC configurations, verify your domain and IP reputation, and review your email content for potential spam triggers. For bounce issues, ensure recipient addresses are valid, confirm your server isn’t blacklisted, and adjust authentication or relay settings if necessary.
For those testing cold email outreach on a larger scale, tools like Infraforge offer real-time deliverability monitoring and alerts. Its Masterbox feature consolidates emails from all your accounts, making troubleshooting much simpler.

When it comes to large-scale cold email campaigns, basic server tests just don’t cut it. Advanced deliverability testing is essential to ensure your emails land in inboxes, not spam folders. That’s where Infraforge comes in. With features like dedicated IPs, pre-warmed domains, automated DNS setup, SSL and domain masking, and an API for seamless scaling, Infraforge fine-tunes your email infrastructure to dodge spam traps and maintain a strong sender reputation.
Infraforge doesn’t just set up your email system - it optimizes it for maximum deliverability. For example, benchmarks reveal inbox placement rates as high as 92%, compared to 55% on standard servers. One campaign integrated with Salesforge hit 97% deliverability, sending 50,000 emails daily with a complaint rate of less than 0.5%, as verified by Google Postmaster Tools.
Launching new domains without preparation can lead to quick spam flagging. Pre-warmed domains and mailboxes help avoid this by building a positive sender reputation with major ISPs before your campaign begins. By using legitimate sending patterns, you establish trust and reduce bounce rates from day one.
Start by sending small batches (50–500 emails) to seed lists across providers like Gmail, Yahoo, and business domains. Use Infraforge’s dashboard to monitor inbox placement, aiming for less than 1% spam placement and over 95% deliverability before ramping up. In one example, a campaign saw its spam rate drop from 15% to 2% after switching to pre-warmed infrastructure. This process also ensures your SPF, DKIM, and DMARC records are properly configured, and that your email content steers clear of spam filters.
Dedicated IPs are a game-changer for email deliverability. They give you full control over your sending reputation, unlike shared IPs where one bad actor can ruin it for everyone. Start small - send about 100 emails per day and gradually scale up to 10,000+, keeping a close eye on your IP reputation with tools like Sender Score or Google Postmaster.
You can test each IP’s connectivity using telnet (look for a 220 ESMTP response). Infraforge’s multi-IP provisioning allows you to rotate between IPs during testing. For instance, you can send 1,000 emails per IP and track individual reputation scores. If any IP falls below 90% deliverability, simply switch to another using Infraforge’s API.
SSL and domain masking add an extra layer of security and professionalism. This feature protects your main domain’s reputation by displaying a branded website while keeping your primary domain hidden. During testing, confirm STARTTLS configuration using telnet and send masked test emails to verify that encryption handshakes are completing without affecting spam scores.
Once these configurations are solidified, you can rely on advanced monitoring to maintain high performance.
Infraforge’s API makes scaling fast and efficient. You can query real-time metrics like send volume, bounce rates, open rates, and reputation scores. For example, during a 10,000-email test, you can use the /metrics?domain=example.com endpoint to fetch JSON data every five minutes. If bounce rates exceed 5%, the system can automatically alert you.
The real-time deliverability monitoring feature tracks performance across all mailboxes using the Masterbox tool. This consolidates emails from multiple accounts into one view, making it easier to troubleshoot issues when managing dozens - or even hundreds - of mailboxes. And when you need to scale up quickly, the API’s /provision-ip endpoint lets you add dedicated IPs programmatically for campaigns exceeding 100,000 emails.
At $3–4 per mailbox per month, Infraforge is a cost-effective solution. For 200 mailboxes, it totals $651 monthly - far less than Google Workspace ($1,680) or MS365 ($1,200) for the same volume. Plus, Infraforge offers features tailored specifically for cold outreach that those platforms don’t.
"Its deliverability and impact are unmatched. If you're serious about outreach and want the best tool in the market, Infraforge is the only choice."
Email server testing is an ongoing process that ensures smooth communication and dependable deliverability. Start by checking your DNS and MX records, then move on to testing SMTP, IMAP, and POP3 connectivity with tools like Telnet or online diagnostics. Make sure authentication is functioning properly, TLS/SSL encryption is active, and your server logs show error-free connections. Sending test emails to various providers, verifying authentication headers, and confirming inbox placement are all critical steps. A thorough approach like this builds a foundation for secure and efficient email performance.
To keep your system secure, restrict email sending to authenticated users, disable open relay, and use up-to-date encryption protocols. Neglecting these measures could result in your domain being blocklisted, lost opportunities, and costly fixes. Spending a few minutes on detailed testing now can save you hours of troubleshooting down the line.
For high-volume email campaigns, basic testing isn’t enough. You’ll need to manage IP reputation, gradually warm up domains, monitor bounce rates, and stay on top of spam filter feedback loops to maintain inbox placement over time. Once the fundamentals are in place, advanced tools like Infraforge can simplify long-term deliverability management. Starting at $99 per month for dedicated IPs, Infraforge offers features like pre-warmed domains ready in minutes, automated DNS setup, and real-time monitoring via APIs. At $3–4 per mailbox per month, it’s designed specifically for cold outreach, offering a cost-effective alternative to general email platforms.
Whether you’re handling a few mailboxes or sending thousands of emails daily, the core principles remain the same: test thoroughly, secure your setup, monitor consistently, and adapt as your needs evolve. With the right tools and a disciplined testing process, your emails will reliably reach their intended recipients - helping your business operate more effectively.
If your test emails keep ending up in spam folders, there are a few steps you can take to fix the problem. Start by ensuring your SPF, DKIM, and DMARC records are correctly set up and aligned. These records help verify your emails, and tools like Infraforge can make the setup process easier with automated DNS configuration.
Next, focus on gradually warming up your IP addresses and domains. This step is crucial for building a good sending reputation. Infraforge’s Warmforge tool can streamline this process, helping you establish trust with email providers. Additionally, using dedicated IPs and domain masking can enhance your email deliverability and safeguard your sender reputation.
Lastly, steer clear of spam triggers by crafting personalized and relevant content. Keep your mailing list in top shape by regularly removing invalid or inactive addresses. To stay ahead of potential issues, monitor your email deliverability with real-time alerts - Infraforge offers tools to help you catch and resolve problems quickly.
When testing email protocols, it's essential to understand their distinct roles:
Each protocol plays a specific role in managing email communication, making thorough testing crucial for a reliable and efficient email experience.
Using TLS/SSL encryption for your email server settings is a must when it comes to securing your email communications. This technology encrypts the data traveling between your email client and the server, making it much harder for anyone to intercept or access sensitive information.
Not only does this safeguard your private emails, but it also aligns with current security standards. Without encryption, your messages and even your login credentials could be exposed to cybercriminals. Simply put, enabling TLS/SSL is a key step in ensuring your emails stay private and protected.